
-
Model Serving/Training 환경 제공
-
AI Gateway 운영 및 개발
-
MLOps 구축
그 중 저의 업무는 “AI Gateway 운영 및 개발“ 입니다. 업무가 처음 주어졌을 때 참고할 수 있는 문서나 블로그 등 정보들이 부족했고 대규모 모델 운영을 위해서는 어떤 Tool을 선택해야 하는지 고민했습니다. Opensource(Kong, LiteLLM ..) 와 Azure Gateway(Application Gateway, API Management) 중 최종적으로 API Management 를 아래와 같은 이유로 선택하게 되었습니다.
- 이유 1 : 모든 Model 들은 Azure 기반의 플랫폼에서 동작하고 연계가 되어야 함.
- 이유 2 : MS Korea Manager 분들의 적극적인 지원.
- 이유 3 : 깔끔하고 정리된 문서 및 가이드가 존재.
- 가이드 링크 : GitHub - Azure-Samples/AI-Gateway: APIM ❤️ AI - This repo contains experiments on Azure API Management's AI capabilities, integrating with Azure OpenAI, AI Foundry, and much more 🚀 . New workshop experience at https://aka.ms/ai-gateway/workshop
위 2가지 이유로 Azure API Management 를 시작하게 되었습니다.
0. AI Gateway 란?
AI Gateway 란 “여러 LLM 및 ML 모델들을 관리 및 추적하고 연결해주는 중개자 역할“ 라고 생각합니다. AI Gateway 는 일반적인 API Gateway 와는 다른 성격을 가지고 있습니다. 차이점을 표로 나타내었습니다. 표에 있는 내용 이외에도 많은 기능들이 추가 및 수정되어지고 있습니다.
| 기능 | AI Gateway | API Gateway |
|---|---|---|
| 메트릭 및 로깅 | 토큰 수, 모델 종류, 프롬프트 로그 | 요청 수, 응답 시간, 오류율 |
| 워크로드 | LLM API, ML API 등 | RESTful API, gRPC, SOAP 등 일반적인 마이크로서비스 API |
| 응답 지원 |
LLM 응답의 스트리밍 (SSE) 지원에 최적화 | Batch 응답에 최적화 |
| Rate Limit |
Token Usage 기준 | Request 기준 |
| Filter |
인증 뿐만 아니라 PII, Content Filter(In/Out) 중요 | 다양한 인증 방식 처리 중요 |
많은 기능들이 있지만 초기 구축 시 고민해야 하는 부분은 아래와 같았습니다.
-
Logging, Metric, Billing 시스템 구축
-
RAI(Responsible AI) 지원
-
여러 조직들의 Key 관리
-
Custom 기능 구현 필요
-
Token Limit 관리
위 기능들을 어떻게 구축하고 운영하고 있는지, 어떠한 어려움이 있었는지 대해서 하나하나 얘기해보려고 합니다.
1. API Management 소개 및 중요 개념
내용에 들어가기 전, 간단한 APIM 개념들 및 중요하게 알아야 할 부분들에 대해서 설명 드리겠습니다.
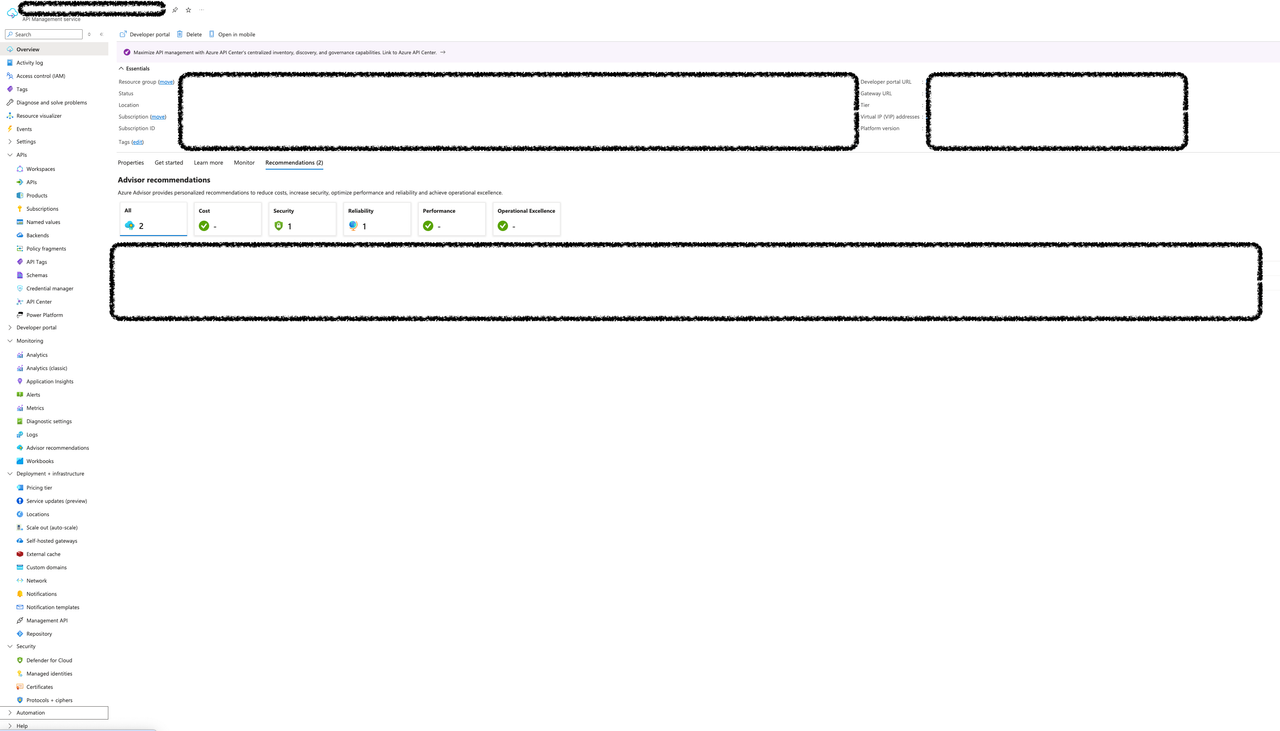
APIM(API Management)은 Azure Managed API Gateway 서비스입니다. Azure 에서 모든 APIM 관련한 DB, Logging, Metric 정보들을 관리합니다. 그래서 BlackBox 영역이 많이 있습니다.
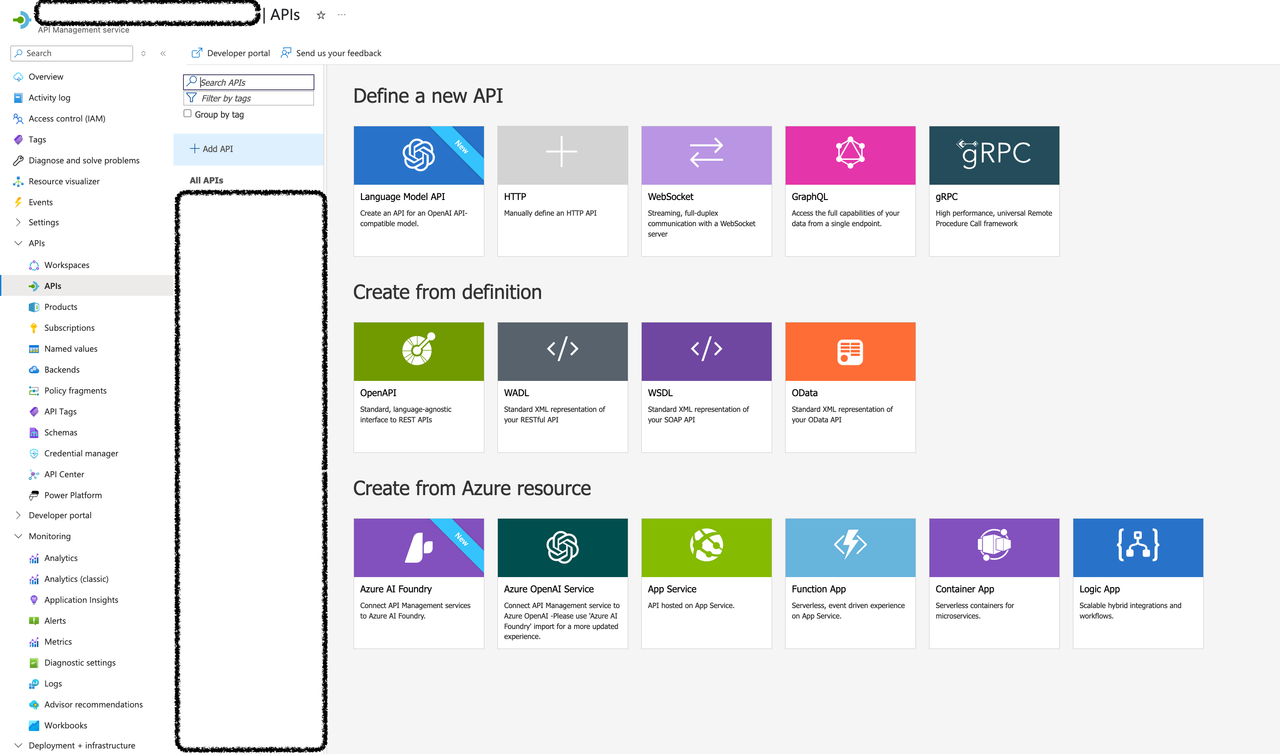
간단한 API 등록 Flow 예시입니다. API 등록시 [APIs] → [Add API] 사용하여 뒷 단의 API들과 연결합니다.
상세한 등록 과정은 LLM API, HTTP, OpenAI Service 등 타입에 따라 다른 설정을 해줘야 하기 때문에 문서들을 참고해야 합니다.
핵심 Component에 대한 설명입니다.
- APIs: 외부에서 호출 가능한 API 엔드포인트 정의 및 다양한 API 와의 연동
-
Products: 여러 API 를 패키지 형태로 묶어서 외부 사용자에게 제공하는 단위
-
Subscriptions: 사용자(또는 애플리케이션)가 특정 Product에 접근하기 위한 키 기반 인증 단위
-
Named Values: 전역 설정 값이나 환경 변수처럼 사용할 수 있는 Key-Value 쌍
-
Backend: 실제 API 호출을 프록시할 백엔드 서비스의 연결 정보
-
Policy: Input/Output 에 대한 특정 Custom Logic을 작성할 수 있는 XML Editor.
중요 개념을 알았다면 아래 APIM - Model Serving 관리 및 운영 환경에 대한 그림이 조금 이해 할 수 있습니다. 아래 그림은 대략적인 구조 예시이며 아키텍처가 변경되고 있기에 변경점이 존재할 수 있습니다. 전체적인 그림을 숙지하시고 다음 세부적인 항목으로 들어가서 어떤 설계를 진행했는지 공유 드리겠습니다.

2. Policy
Policy 기능은 APIM 요청들에 대해서 Custom 한 동작을 하도록 하기 위해 Policy 를 작성할 수 있습니다. Policy 는 크게 4가지 영역으로 분류됩니다.
-
Inbound: 클라이언트 요청이 들어오는 경우
-
Backend: Inbound 처리 후 실제 백엔드 API 호출하는 경우
-
Outbound: 백엔드 API에서 응답을 받은 후, 클라이언트에게 응답을 보내는 경우
-
OnError: 위 3가지 구역에서 에러가 발생한 경우
<policies> <inbound> <base /> </inbound> <backend> <base /> </backend> <outbound> <base /> </outbound> <on-error> <base /> </on-error> </policies>1234567891011121314
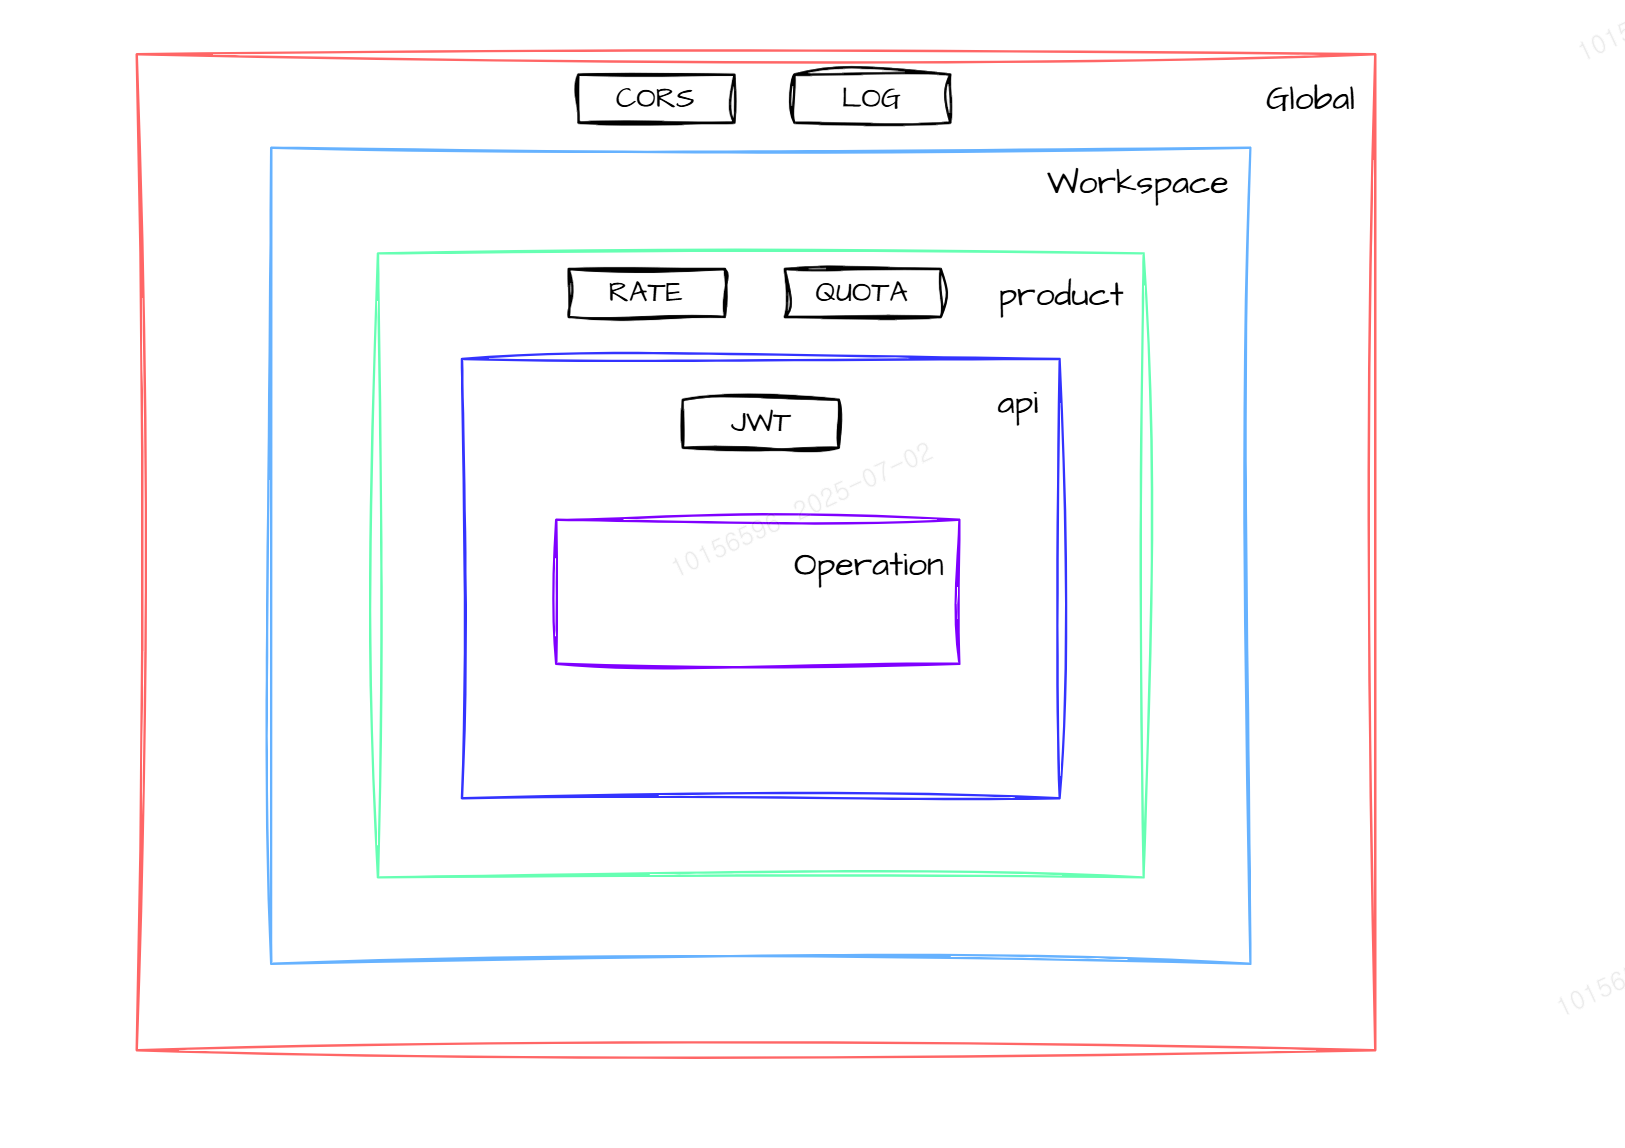
또한 Policy 는 API 뿐만 아니라 다양한 곳에 적용할 수 있습니다. 아래 표는 어떻게 Policy 상속을 받는지에 대한 Scope 그림입니다. 만약 상위 레벨의 Policy 상속을 피하고 싶다면 어떻게 해야할까요? <base /> 영역을 제거하시면 됩니다. 그리고 <base /> 앞에 Policy를 작성할지 뒤에 작성할지 따라서 순서가 달라진다는 점 유의해서 사용해야 합니다.
그리고 Policy 작성하는 것이 생각보다 까다롭습니다. Policy 를 작성하고 디버깅하는 어려움이 있고, VS Code 같은 IDE 를 사용한다고 해도 에러 메세지가 명확하지 않기에 원인을 찾기 어렵습니다. 그래서 MS 측에서는 Policy toolkit을 제공하고 있습니다. 이 툴킷은 C# 코드를 이용하여 Policy XML 만들기를 도와주는 역할을 합니다. 그러나 모든 정책이 제공되지 않고 C#을 개발 할 인력이 없어 저희는 사용하지 않았습니다.
* 참고 링크 : https://github.com/Azure/azure-api-management-policy-toolkit
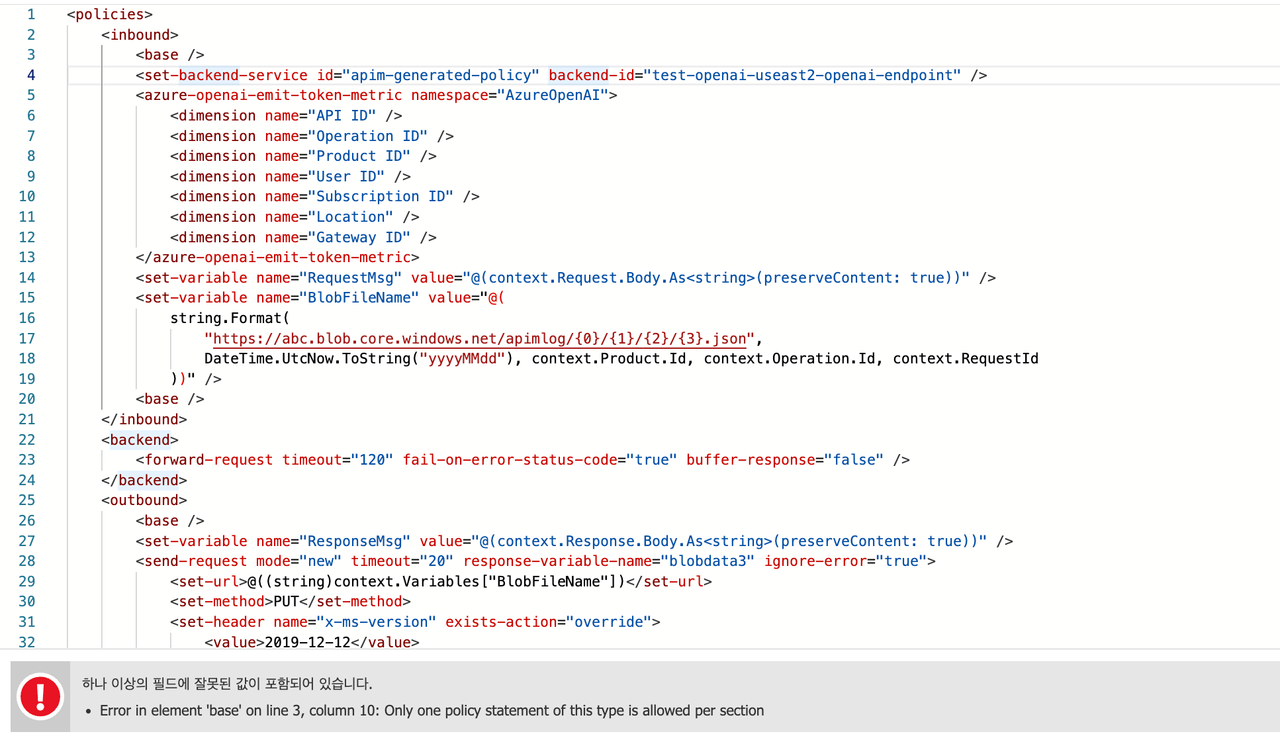
간단한 예시를 진행해보고 디버깅 방법을 소개 드리겠습니다. Request/Response 가져있다가 Storage API 이용하여 저장하는 예제입니다.
<policies> <inbound> <base /> <set-backend-service id="apim-generated-policy" backend-id="test-openai-useast2-openai-endpoint" /> <set-variable name="RequestMsg" value="@(context.Request.Body.As<string>(preserveContent: true))" /> <set-variable name="BlobFileName" value="@( string.Format( "https://abc.blob.core.windows.net/apimlog/{0}/{1}/{2}/{3}.json", DateTime.UtcNow.ToString("yyyyMMdd"), context.Product.Id, context.Operation.Id, context.RequestId ))" /> <base /> </inbound> <backend> <forward-request timeout="120" fail-on-error-status-code="true" buffer-response="false" /> </backend> <outbound> <base /> <set-variable name="ResponseMsg" value="@(context.Response.Body.As<string>(preserveContent: true))" /> <send-request mode="new" timeout="20" response-variable-name="blobdata3" ignore-error="true"> <set-url>@((string)context.Variables["BlobFileName"])</set-url> <set-method>PUT</set-method> <set-header name="x-ms-version" exists-action="override"> <value>2019-12-12</value> </set-header> <set-header name="x-ms-blob-type" exists-action="override"> <value>BlockBlob</value> </set-header> <set-header name="Accept" exists-action="override"> <value>application/json</value> </set-header> <set-body template="liquid"> { "inbound": { "request_msg": "{{context.Variables["RequestMsg"]}}" }, "outbound": { "response_msg": "{{context.Variables["ResponseMsg"]}}" } } </set-body> </send-request> <authentication-managed-identity resource="https://storage.azure.com" /> </outbound> <on-error> <base /> </on-error> </policies>1234567891011121314151617181920212223242526272829303132333435363738394041424344454647
2-1. Debugging
위 코드는 잘못되었습니다. 친절하게 “3번째 줄의 정책에서 중복된 무언가가 들어갔다”라고 얘기해줍니다.
그리고 “<base />“를 제거하고 Save 합니다. 저장 후 요청을 보내보면 아래의 에러가 발생합니다. 어떤 부분이 잘못되었는지 명확하지 않습니다.
{ "statusCode": 500, "message": "Internal server error", "activityId": "abc6ad3c-cc26-4d39-9850-0e00c52041a6" } 123456
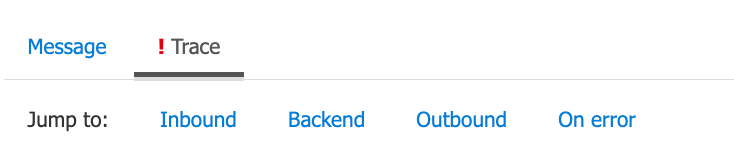
그럼 Tracing 을 해봐야 합니다. 포탈의 [Test] 에서 Trace 기능을 한다면 각 영역에 대한 로그가 나옵니다.
set-variable (0.379 ms) { "messages": [ { "message": "Expression evaluation failed.", "expression": "\n string.Format(\n \"https://abc.blob.core.windows.net/apimlog/{0}/{1}/{2}/{3}.json\",\n DateTime.UtcNow.ToString(\"yyyyMMdd\"), context.Product.Id, context.Operation.Id, context.RequestId\n )", "details": "Object reference not set to an instance of an object." }, "Expression evaluation failed. Object reference not set to an instance of an object.", "Object reference not set to an instance of an object." ] }123456789101112
<set-variable name="BlobFileName" value="@{ var operation = context.Operation.Id; var requestId = context.RequestId; var date = System.DateTime.UtcNow.ToString("yyyyMMdd"); return $"https://abc.blob.core.windows.net/apimlog/{date}/{operation}/{requestId}.json"; }" />1234567
BlobFileName 변수를 만드는 부분이 잘못되었다는 것을 알 수 있습니다. 이런 방식으로 Policy 수정을 하며 원인들을 고쳐나가야 합니다.
위에서 볼 수 있듯 Policy 작성 및 디버깅에 대해 힘든 부분이 있습니다. 물론 좋은 Tool 들이 제공되지만 많은 로직이 들어가기에는 한계점이 보였고 개발자들이 익숙하지 않은 언어이다보니 개발 시간도 많이 든다는 단점이 있습니다.
현재 Retry, Third Party API 연동, Rate-Limit 등 다양한 요구 사항들이 Policy 기반으로 작성되어지고 있습니다. 또한 MS 에서는 Policy Snippet(GitHub - Azure/api-management-policy-snippets: Re-usable examples of Azure API Management policies) 들을 제공하고 있습니다.
3. Key Management System
Key Management 시스템의 요구 사항은 아래와 같습니다.
-
여러 에이전트 및 클라이언트의 Key 관리
-
에이전트 당 사용하는 모델들의 제공 및 추적(Logging, Metrics, Billing)
전체 아키텍처에서 볼 수 있듯 Product 기능 + Subscription 기능을 이용하였습니다.
자세한 내용은 Azure OpenAI Service 와 그 외 서빙 모델로 나눠 봐야합니다. 왜냐하면 모델이 서빙 된 형태가 서로 다릅니다. 일반 서빙 된 모델(AML, Databricks ..)은 각각의 Endpoint 와 Key 를 가지고 서빙이 됩니다. 그러나 Azure OpenAI Service 는 다수 Endpoint 와 하나의 Key 를 제공합니다.
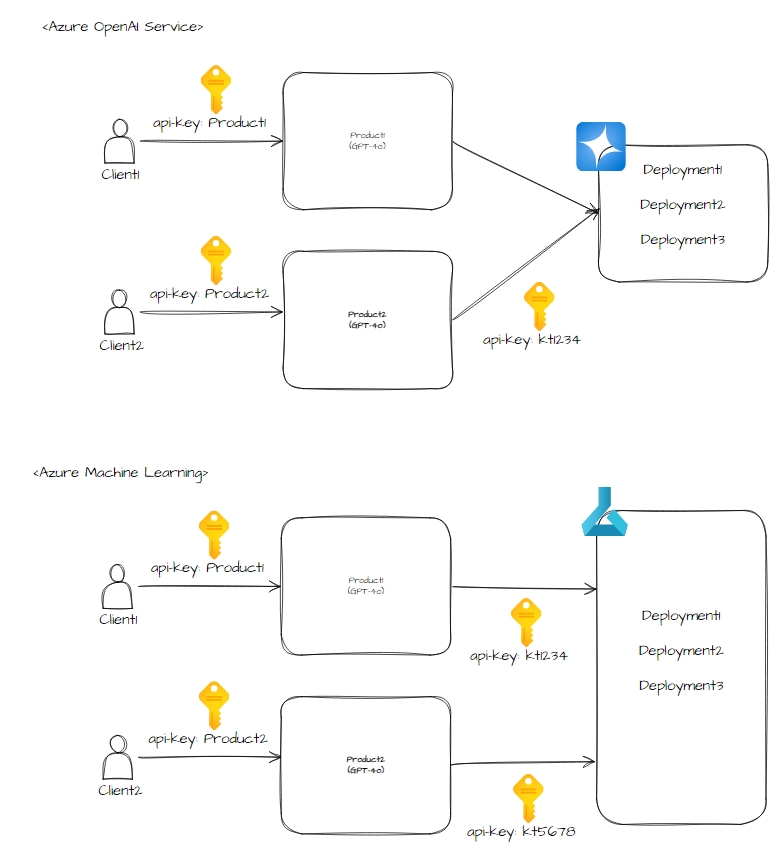
위와 같이 된다면 Logging 및 Metrics 검색 시, 각 Product 에 맞게 사용한 로그 검색하기 용이하고 새로운 Azure OpenAI Serivce 내 Deployment 배포 시 API 를 새로 생성하지 않고 쉽게 외부로 API 를 제공해 줄 수 있습니다.
또한 형식이 다른 Key 를 하나의 헤더 필드로 통합하여 제공 할 수 있습니다.
예시: api-key == api-key(Azure OpenAI Service) + Authorization(Databricks)
그러나 이 형상의 문제점도 존재합니다. 만약 Product1 에서 키를 Product2 팀으로 유출 되었다면 Product2 팀이 고의로 Product1 팀의 키를 가지고 접근할 수 있습니다.
이러한 경우를 방지하기 위해서 특정 구역(Container App, Local ..) 에서만 접근 가능하도록 IP-Filtering 을 적용하면 문제를 해결 할 수 있습니다.. APIM 에서는 Policy 로 제공합니다.
<ip-filter action="allow | forbid"> <address>address</address> <address-range from="address" to="address" /> </ip-filter>1234
4. Logging, Metrics
처음엔 Azure Managed System 이라 Logging 및 Metrics 에 대한 설정은 모든 것이 알아서 될 줄 알았지만 큰 오산이였습니다. 가장 어려운 부분이 되어 저희를 괴롭혔던 부분입니다.
현재 AI Gateway 는 LLM(Chat) 뿐만 아니라 ML(Rerank, Embedding ..) 등을 지원하고 있습니다. 이러한 경우엔 아래 응답과 같이 응답이 다르다는 문제가 있었습니다. 그리고 Custom Model 인 Midm 또는 Finetuned Llama 등을 서빙할 때는 vLLM 을 사용하고 있습니다. 또 하나의 중요한 문제는 Batch, Stream 2가지 경우 메트릭, 로그들을 저장해야한다는 문제가 있었습니다. 이러한 문제들을 해결한 과정들을 설명드리겠습니다.
- Embedding Response
TypeScript▼{ "embeddings": [ [ 2.1109459400177, -0.8103682994842529 ... ] ], "inputTokens": 8 }12345678910 - Rerank Response
TypeScript▼{ "rerankingResults":[ { "score":-1.4186465740203857 } ... ], "inputTokens":18 }123456789
- vLLM OpenAI Compatible Response : Batch Response / Stream Response
TypeScript▼{ "id": "chatcmpl-63347036-9fd4-4e2d-87fa-f8c165106f98", "object": "chat.completion", "created": 1748435066, "model": "midm-bitext-base-chat", "choices": [ { "index": 0, "message": { "role": "assistant", "reasoning_content": null, "content": "The poem you've provided is called \"Sonnet 29\" by William Shakespeare. It is a sonnet that expresses the poet's admiration for a beloved person, who is not married to the poet. The speaker acknowledges that others may try to describe the beloved's beauty using flowery language, but he believes that his own straightforward words will do justice to their relationship.\n\nIn the first quatrain, the speaker describes feeling inferior compared to other poets who praise the beloved. However, in the second quatrain, he decides to write about the beloved anyway, comparing himself to a small boat sailing on a vast ocean with a larger ship representing other poets.\n\nIn the third quatrain, the speaker asserts that his poetry will ensure that the beloved's memory lives on, even after the speaker is gone. In the final couplet, the speaker emphasizes that he does not need to use elaborate language to describe the beloved's beauty because their love is sincere and true.\n\nOverall, the poem is a tribute to the beloved's beauty and the speaker's enduring love for them.", "tool_calls": [] }, "logprobs": null, "finish_reason": "stop", "stop_reason": 131301 } ], "usage": { "prompt_tokens": 571, "total_tokens": 789, "completion_tokens": 218, "prompt_tokens_details": null }, "prompt_logprobs": null }123456789101112131415161718192021222324252627TypeScript▼data: {"id":"chatcmpl-31931082-80b9-4082-a32a-b3b015d40c3f","object":"chat.completion.chunk","created":1748434946,"model":"midm-bitext-base-chat","choices":[{"index":0,"delta":{"role":"assistant","content":""},"logprobs":null,"finish_reason":null}]} data: {"id":"chatcmpl-31931082-80b9-4082-a32a-b3b015d40c3f","object":"chat.completion.chunk","created":1748434946,"model":"midm-bitext-base-chat","choices":[{"index":0,"delta":{"content":"The"},"logprobs":null,"finish_reason":null}]} data: {"id":"chatcmpl-31931082-80b9-4082-a32a-b3b015d40c3f","object":"chat.completion.chunk","created":1748434946,"model":"midm-bitext-base-chat","choices":[{"index":0,"delta":{"content":" poem"},"logprobs":null,"finish_reason":null}]} data: {"id":"chatcmpl-31931082-80b9-4082-a32a-b3b015d40c3f","object":"chat.completion.chunk","created":1748434946,"model":"midm-bitext-base-chat","choices":[{"index":0,"delta":{"content":" you"},"logprobs":null,"finish_reason":null}]} ... data: {"id":"chatcmpl-804a2293-6caa-4c05-9484-512f1572577f","object":"chat.completion.chunk","created":1748434993,"model":"midm-bitext-base-chat","choices":[],"usage":{"prompt_tokens":571,"total_tokens":789,"completion_tokens":218}} data: [DONE]1234567 - Azure OpenAI Response(gpt-4o) : Batch Response / Stream Response
TypeScript▼{ "choices": [ { "finish_reason": "stop", "index": 0, "logprobs": null, "message": { "annotations": [], "content": "Hello! 😊 How can I assist you today?", "refusal": null, "role": "assistant" } } ], "created": 1748434738, "id": "chatcmpl-BcA2EFNgfpdhsZicliJdjYehp1MjN", "model": "gpt-4o-2024-11-20", "object": "chat.completion", "system_fingerprint": "fp_ee1d74bde0", "usage": { "completion_tokens": 11, "completion_tokens_details": { "accepted_prediction_tokens": 0, "audio_tokens": 0, "reasoning_tokens": 0, "rejected_prediction_tokens": 0 }, "prompt_tokens": 8, "prompt_tokens_details": { "audio_tokens": 0, "cached_tokens": 0 }, "total_tokens": 19 } }1234567891011121314151617181920212223242526272829303132333435TypeScript▼data: {"choices":[],"created":0,"id":"","model":"","object":"","prompt_filter_results":[{"prompt_index":0,"content_filter_results":{"hate":{"filtered":false,"severity":"safe"},"jailbreak":{"filtered":false,"detected":false},"self_harm":{"filtered":false,"severity":"safe"},"sexual":{"filtered":false,"severity":"safe"},"violence":{"filtered":false,"severity":"safe"}}}]} data: {"choices":[{"content_filter_results":{},"delta":{"content":"","refusal":null,"role":"assistant"},"finish_reason":null,"index":0,"logprobs":null}],"created":1748434873,"id":"chatcmpl-BcA4Pgg52Sbrr45CZXUVgBFsqhMZ1","model":"gpt-4o-2024-11-20","object":"chat.completion.chunk","system_fingerprint":"fp_ee1d74bde0","usage":null} data: {"choices":[{"content_filter_results":{"hate":{"filtered":false,"severity":"safe"},"self_harm":{"filtered":false,"severity":"safe"},"sexual":{"filtered":false,"severity":"safe"},"violence":{"filtered":false,"severity":"safe"}},"delta":{"content":"###"},"finish_reason":null,"index":0,"logprobs":null}],"created":1748434873,"id":"chatcmpl-BcA4Pgg52Sbrr45CZXUVgBFsqhMZ1","model":"gpt-4o-2024-11-20","object":"chat.completion.chunk","system_fingerprint":"fp_ee1d74bde0","usage":null} data: {"choices":[{"content_filter_results":{"hate":{"filtered":false,"severity":"safe"},"self_harm":{"filtered":false,"severity":"safe"},"sexual":{"filtered":false,"severity":"safe"},"violence":{"filtered":false,"severity":"safe"}},"delta":{"content":" KT"},"finish_reason":null,"index":0,"logprobs":null}],"created":1748434873,"id":"chatcmpl-BcA4Pgg52Sbrr45CZXUVgBFsqhMZ1","model":"gpt-4o-2024-11-20","object":"chat.completion.chunk","system_fingerprint":"fp_ee1d74bde0","usage":null} .... data: {"choices":[{"content_filter_results":{},"delta":{},"finish_reason":"stop","index":0,"logprobs":null}],"created":1748434873,"id":"chatcmpl-BcA4Pgg52Sbrr45CZXUVgBFsqhMZ1","model":"gpt-4o-2024-11-20","object":"chat.completion.chunk","system_fingerprint":"fp_ee1d74bde0","usage":null} data: {"choices":[],"created":1748434873,"id":"chatcmpl-BcA4Pgg52Sbrr45CZXUVgBFsqhMZ1","model":"gpt-4o-2024-11-20","object":"chat.completion.chunk","system_fingerprint":"fp_ee1d74bde0","usage":{"completion_tokens":528,"completion_tokens_details":{"accepted_prediction_tokens":0,"audio_tokens":0,"reasoning_tokens":0,"rejected_prediction_tokens":0},"prompt_tokens":28,"prompt_tokens_details":{"audio_tokens":0,"cached_tokens":0},"total_tokens":556}} data: [DONE]12345678
4-1. Metrics
Metric 은 토큰 사용량이 중요했습니다. 토큰 사용량을 기반으로 Billing 이 이루어지고 사용자들에겐 정말 중요한 정보입니다. 따라서 각 모델이 사용하는 토큰 사용량을 추출하는 과정을 설명 드리겠습니다.
위에서 볼 수 있듯 다양한 형태의 응답으로 토큰 사용량을 받습니다. 이러한 경우 저희가 직접 응답을 Parsing 하여 Metric 을 뽑아내야 합니다. 운이 좋게도(?) OpenAI Format 에 대한 응답은 손쉽게 APIM에서 지원하는 Policy를 적용하여 추출 할 수 있었습니다. 따라서 vLLM(OpenAI Compatible API), Azure OpenAI 기반으로 서빙되는 모델들은 아래의 Policy 를 API 에 추가하여 해결하였습니다.
Policy 와 설정을 적용한다면 Application Insight 로 Custom Metric 이 보내지고 그것을 [Metrics] 라는 탭에서 볼 수 있습니다.

<inbound> <azure-openai-emit-token-metric namespace="midm"> <dimension name="API ID" /> ... </azure-openai-emit-token-metric> <base /> ... </inbound>12345678

그러나 Rerank, Embedding 같은 경우 “inputTokens“ 라는 필드에서 Metric 을 뽑아내야 했습니다. 이것도 Policy 를 수정해야 합니다. 하지만 저희가 직접 XML 코드를 작성하여야 했습니다. 방법은 Outbound 영역에서 Response 의 필드에서 “inputTokens“을 emit-metrics Policy 를 사용하여 Application Insight 로 보내는 것입니다.
emit-metrics 같은 경우는 inbound, outbound, backend, on-error 영역에서 원하는 값을 지정된 Application Insight로 보내주는 역할을 합니다. Application Insight - Logs - customMetrics 에서 확인 할 수 있습니다.
<outbound> <base /> <emit-metric name="kt-reranker-2-xx-0-inputToken" value="@(context.Response.Body.As<JObject>(preserveContent: true)["inputTokens"].Value<double>())" namespace="kt-reranker-2-xx-0"> <dimension name="kt-reranker-2-xx-0-inputToken" value="@(context.Response.Body.As<JObject>(preserveContent: true)["inputTokens"].ToString())" /> </emit-metric> </outbound>123456
Rerank, Embedding 은 Stream 으로 사용하지 않기 때문에 Outbound 영역에 코드를 넣을 수 있었습니다. 그러나 Stream 응답이 오는 경우는 응답이 끝날 때까지 Blocking 되는 이슈가 있기에 함부로 사용하시면 안됩니다.
이렇게 Custom Metrics + Policys(emit-metrics, azure-openai-emit-token-metric) 를 이용하여 메트릭들을 수집하고 있습니다.
4-2. Logging
Logging은 인프라 구성 중 가장 핵심요소입니다. Logging을 이용하여 에러 디버깅, 프롬프트 확인, Request,Response 확인 등 핵심 역할을 합니다. 그러나 APIM 에서는 문제가 있었습니다. 아래와 같이 저희 팀은 로그를 안전하고 확실하게 저장하기 위하여 많은 노력을 했습니다.
4-2-1. Azure Log analytics
APIM 은 Azure Managed Service 이니 자동으로 로그를 테이블에 저장해줍니다.
그러나 진행하다보니 Log Analytics 로 보낼 수 있는 로그 크기 설정이 “8192“ 로 제한되어 있었습니다.

이렇게 된다면 긴 프롬프트 요청/응답은 8K Byte 까지만 저장되어지고 나머지는 잘려 데이터를 유실하게 됩니다. 이런 문제가 발생하여 제한이 없는 Azure Blob Storage 를 사용하기로 결정하였습니다.
4-2-2. Azure Blob Storage
Azure Blob Storage 저장은 APIM 내에서 별도로 지원하지 않기에 Policy 에서 Inbound 영역에서 Request 저장한 뒤 Outbound 영역에서 Response 를 받아서 Storage API 를 연동하여 적재하는 로직이 필요했습니다. 아래와 같이 날짜/Product/Operation 단위로 폴더를 나누고 로그를 저장하도록 구현을 했습니다.
<policies> <inbound> <include-fragment fragment-id="set-request-headers" /> <set-variable name="RequestMsg" value="@(context.Request.Body.As<string>(preserveContent: true))" /> <set-variable name="BlobFileName" value="@( string.Format( "https://staz01devmagmaais01.blob.core.windows.net/apimlog/{0}/{1}/{2}/{3}.json", DateTime.UtcNow.ToString("yyyyMMdd"), context.Product.Id, context.Operation.Id, context.RequestId ))" /> <base /> ... </inbound> <backend> <forward-request buffer-response="false" /> </backend> <outbound> ... <base /> <set-variable name="ResponseMsg" value="@(context.Response.Body.As<string>(preserveContent: true))" /> <send-request mode="new" timeout="20" response-variable-name="blobdata3" ignore-error="true"> <set-url>@((string)context.Variables["BlobFileName"])</set-url> <set-method>PUT</set-method> <set-header name="x-ms-version" exists-action="override"> <value>2019-12-12</value> </set-header> <set-header name="x-ms-blob-type" exists-action="override"> <value>BlockBlob</value> </set-header> <set-header name="Accept" exists-action="override"> <value>application/json</value> </set-header> <set-body template="liquid"> { "inbound": { "request_msg": "{{context.Variables["RequestMsg"]}}" }, "outbound": { "response_msg": "{{context.Variables["ResponseMsg"]}}" } } </set-body> <authentication-managed-identity resource="https://storage.azure.com" /> </send-request> </outbound> <on-error> <base /> </on-error> </policies>123456789101112131415161718192021222324252627282930313233343536373839404142434445464748

그러나 위 코드는 문제가 있었습니다. Stream 동작이 이루어지지 않는다는 점 입니다. 사용자 입장에서는 일반 배치와 같은 속도로 응답이 가고 있었습니다. Outbound 에 코드를 넣는 순간 모든 응답이 오고 그것을 버퍼에 저장한 뒤 Storage API 전송 후 사용자에게 응답을 보내주었기 때문에 문제가 되었습니다. 또한 요청이 많아지는 경우 APIM Buffer Memory 영향도 무시할 수 없었습니다.
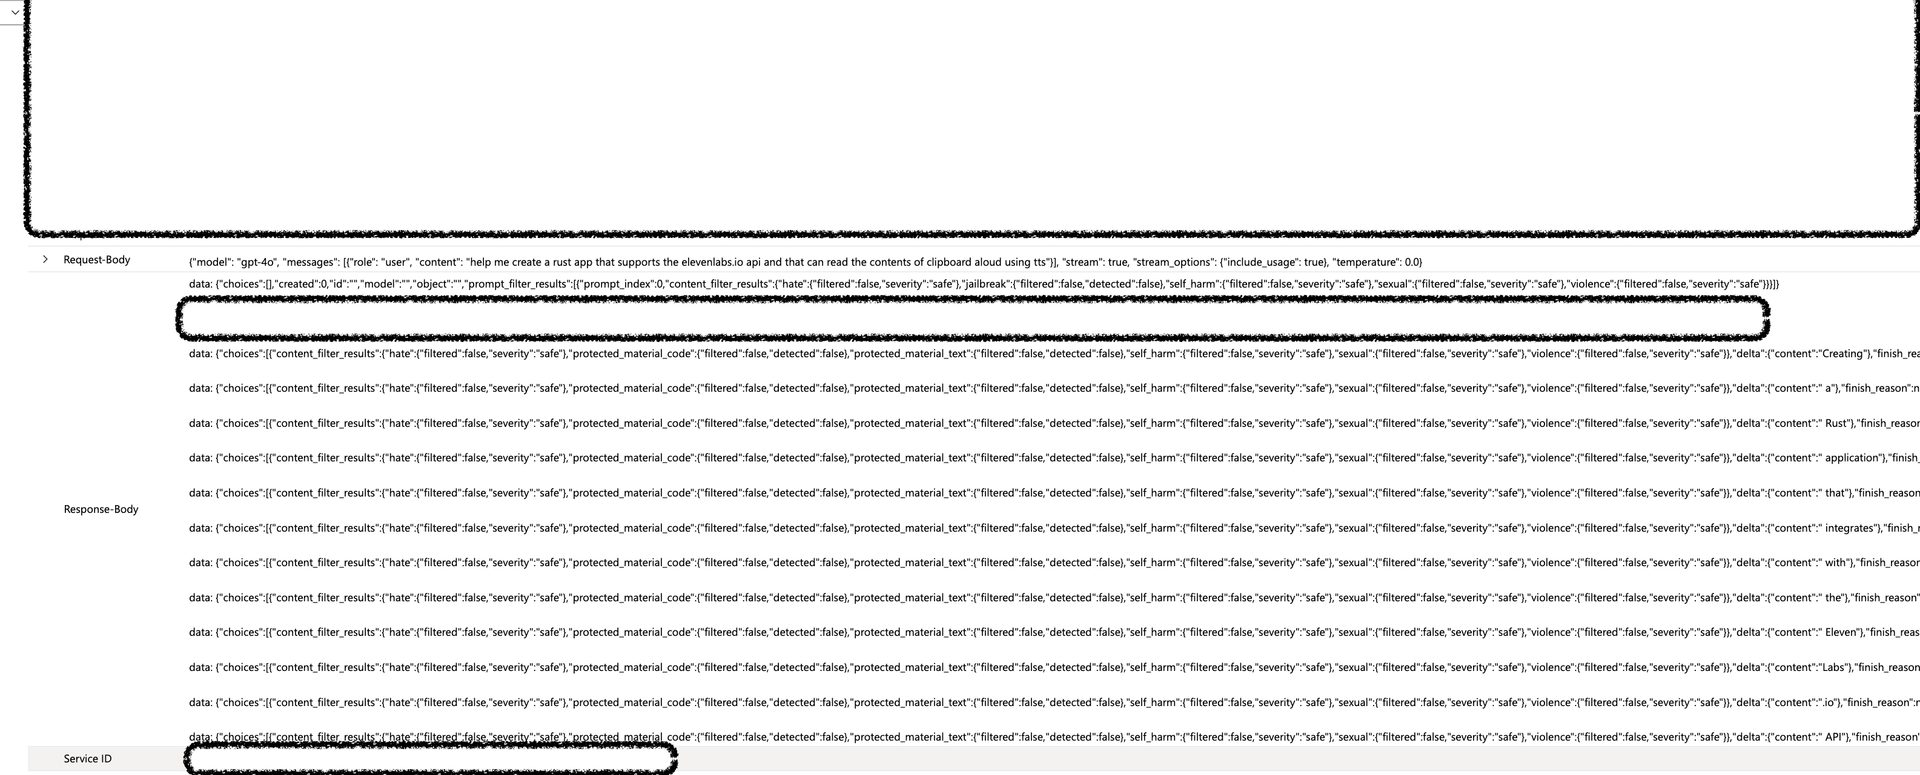
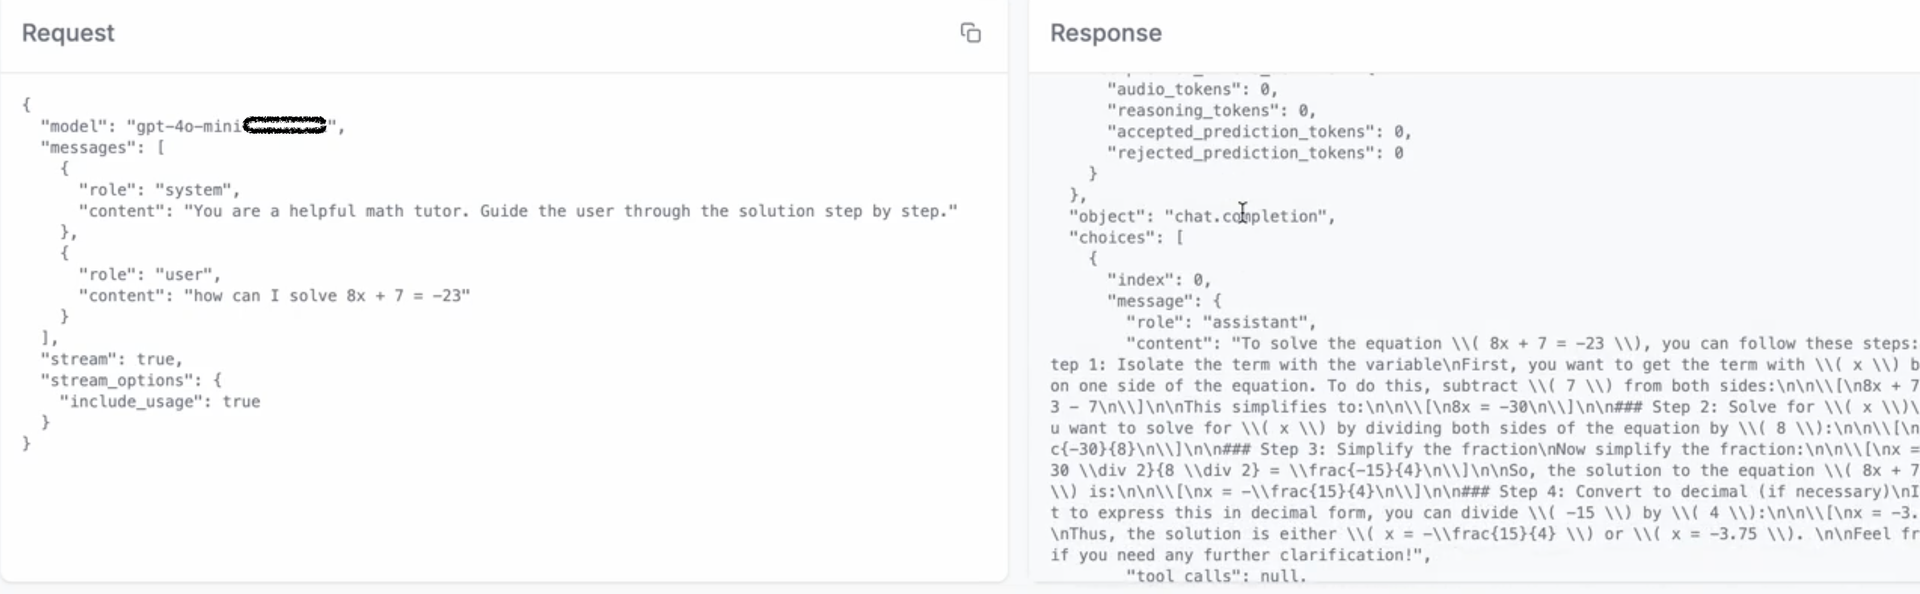
또 다른 문제점은 Log Analytics 와 Storage 저장하는 방법은 아래와 같이 스트림 전체를 저장하고 있습니다. 이러한 경우는 로그를 검색해도 응답이 뭐가나왔는지 다시 Parsing 하여 확인해야합니다. 그리고 아래와 같이 저장하는 경우 용량이 매우 커지므로 Log Analytics 사용이 불가능하였습니다.
저희가 원하는 로그는 아래 로그와 같습니다.(예시: LiteLLM) Stream 으로 응답이 오더라도 choices[*].message 에 모든 응답 토큰이 합쳐져 로그로 저장하기 원했습니다.
결과적으로 Streaming Blocking Issue + Log Format 이상 현상으로 MS APIM 개발팀과 기능 수정에 대해 논의하였습니다.
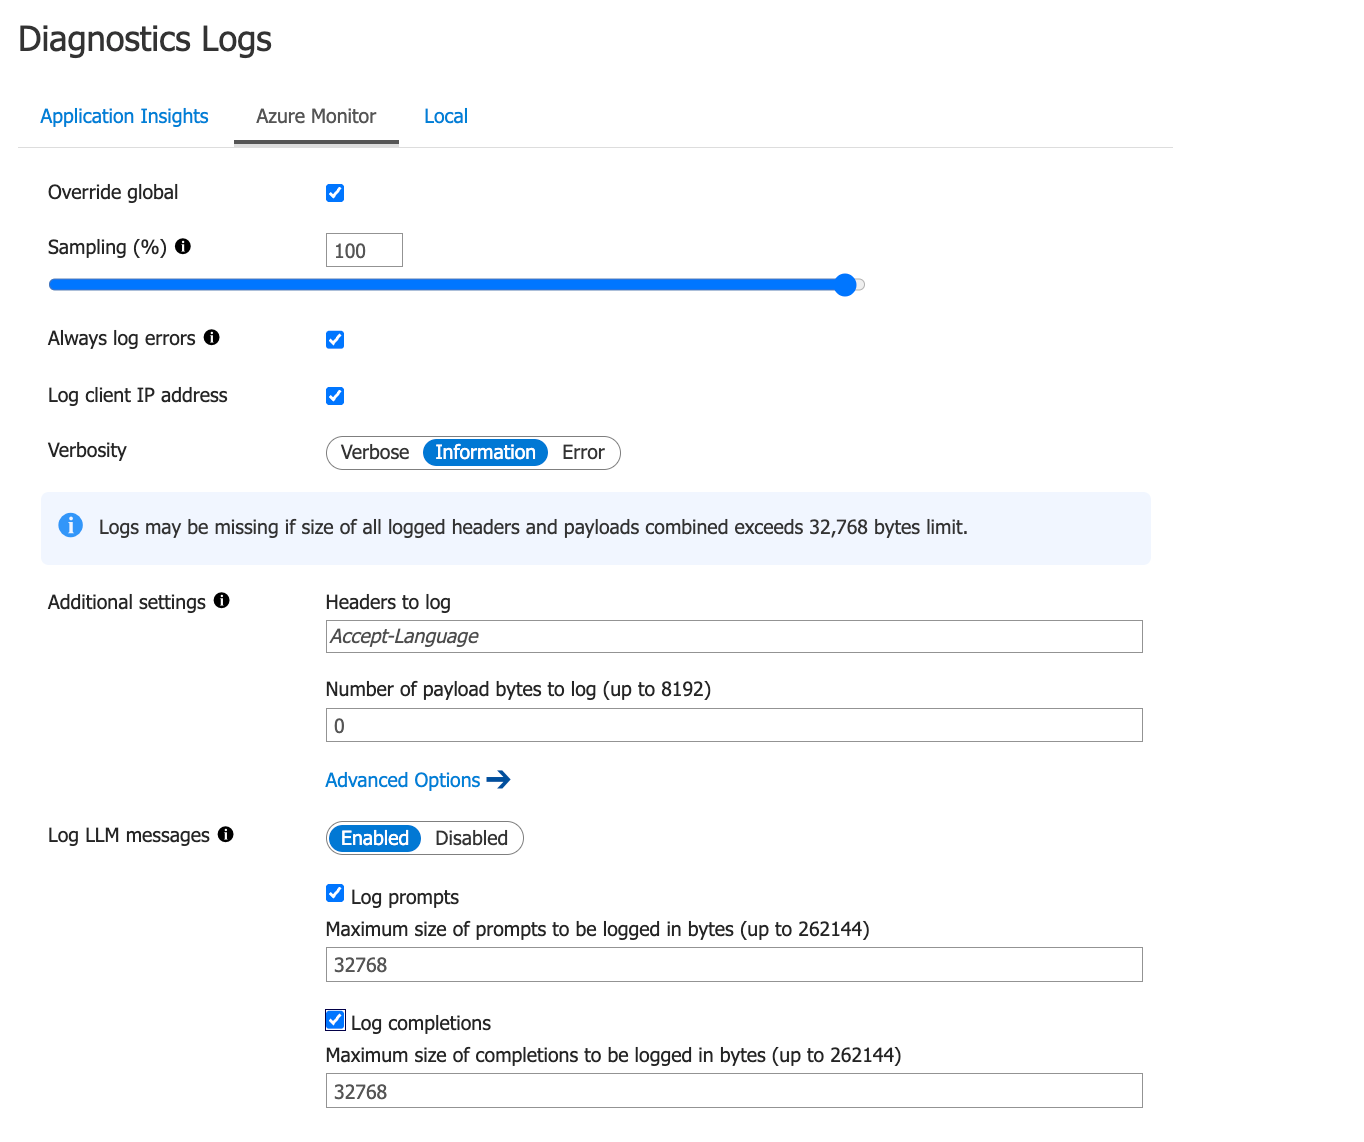
4-2-3. APIM Feature Update
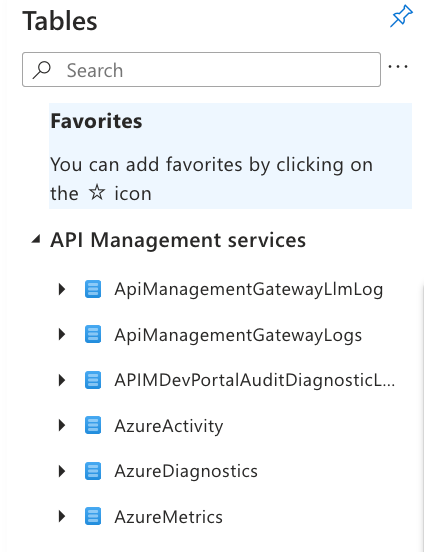
MS 측과 여러 번의 회의를 거쳐 AI 관련한 기능들이 여러가지 나왔습니다. 그 중 저희는 로그가 제일 중요해서 먼저 확인해봤습니다. Log LLM messages 항목이 생겼습니다. 기능은 Log Analytics 에 ApiManagementGatewayLlmLog 테이블이 생기고 거기에 로그를 저장하는 방식입니다.
- OpenAI Format

- Pass Through Format

현재까지는 위와 같이 로그를 저장하고 있습니다.
5. Token Limit
LLM 사용 시 토큰을 제한하는 것은 중요합니다. 비용 관리, 부하 처리, 에러 처리 등 다양한 부분에서 장점을 얻을 수 있습니다. 그리고 모델 내에서도 토큰을 제어할 수 있습니다. 다만 Gateway 단에서 막힌다면 더 빠른 응답과 정확한 Tracing 도 가능합니다. 물론 Gateway 에도 Token Limit 을 위한 메모리 저장소가 필요합니다.
APIM 에서 LLM Token 제어를 어떻게 할까요? 저희는 모델을 Azure OpenAI Service, vLLM OpenAI Compatible Server 로 모델들을 서빙하고 있습니다. 그 중 Azure OpenAI Service 크게 2가지 형태로 나뉩니다.
-
Token Per Minute(TPM): 1 분 당 토큰 제한 수.
-
Provisioned Throughput Units(PTU): 입/출력 토큰을 예측하고 사전에 구매, 예약하는 처리량 단위.
PTU 는 상용 환경이 아니라면 TPM 에 비해 더 비싸질 수 있기 때문에 상용 환경에서만 사용을 권장합니다. 그럼 어떻게 APIM 에서 토큰을 제어하는지 방법에 대해서 알아보겠습니다.
5-1. Policy 이용한 일반 Token Limit
일반적으로는 azure-openai-token-limit, llm-token-limit 이 있습니다. 두 가지 똑같은 기능을 하지만 지원하는 모델이 다릅니다.
-
llm-token-limit:
Azure API Management policy reference - llm-token-limit -
azure-openai-token-limit: Azure API Management policy reference - azure-openai-token-limit
모델에 따라서 응답 포맷이 다르기 때문에 이 글에서는 “azure-openai-token-limit“ 기준으로 작성하겠습니다. 총 2가지 방법으로 제어할 수 있습니다. 속도를 제한할 것 인지, 할당량을 제한할 것인지 2가지 기준으로 Policy 작성이 가능합니다.
- Case1. IP 기반 분당 5000 토큰 제어
<policies> <inbound> <base /> <azure-openai-token-limit counter-key="@(context.Request.IpAddress)" tokens-per-minute="5000" estimate-prompt-tokens="false" remaining-tokens-variable-name="remainingTokens" /> </inbound> <outbound> <base /> </outbound> </policies>1234567891011
- Case2. 구독 ID 기반 월당 10000 토큰 제어
<policies> <inbound> <base /> <azure-openai-token-limit counter-key="@(context.Subscription.Id)" token-quota="100000" token-quota-period="Monthly" remaining-quota-tokens-variable-name="remainingQuotaTokens" /> </inbound> <outbound> <base /> </outbound> </policies>1234567891011
※ estimate-prompt-tokens: 프롬프트에 필요한 토큰 수를 예측할지 여부를 결정.(스트림은 항상 True)
※ remaining-tokens-variable-name: 시간 간격 나머지 토큰 수를 저장하는 변수 이름.
※ remaining-quota-tokens-variable-name: 나머지 토큰 쿼터 수를 저장하는 변수 이름.
만약 제한에 걸린다면 429 응답을 받게 되고 APIM 혹은 Client 측에서 재시도 및 에러 처리를 진행할 수 있습니다.
5-2. Azure OpenAI(PTU + TPM)
“평소 PTU 사용하다가 429(Too Many Requests) 발생 시 TPM 전환하여 모델을 사용” 이라는 요구사항을 받았습니다. 상용 환경에서는 꼭 필요한 기능이라고 보였습니다. 이건 토큰 관련 Policy 활용은 아니지만 다른 방법으로 해결하였습니다. Retry 및 Backend 변경을 통해 만들었습니다. Backend 란 앞서 말했듯 “실제 API 호출을 프록시할 백엔드 서비스의 연결 정보” 입니다. Backend 를 2가지(PTU Deployment, TPM Deployment) 로 나누어 생성해줍니다.


2가지의 Backend 는 서로 다른 모델을 바라보도록 설정했습니다. 다음 Policy 작성을 합니다. Retry Policy 를 Backend 영역에 두고 primary Backend 응답에 따라 outbound 영역으로 갈지 아니면 secondary 에서 재시도 할지 결정할 수 있습니다.
<policies> <inbound> <base /> <set-backend-service backend-id="primary" /> </inbound> <backend> <retry condition="@(context.Response.StatusCode == 429 || context.Response.StatusCode >= 500)" count="5" interval="0" delta="1" max-interval="8" first-fast-retry="false"> <choose> <when condition="@(context.Response.StatusCode == 429 || context.Response.StatusCode >= 500)"> <set-backend-service backend-id="secondary" /> </when> </choose> <forward-request buffer-request-body="true" /> </retry> </backend> <outbound> <base /> </outbound> <on-error /> </policies>1234567891011121314151617181920
- Retry Policy
- Count : 재시도 횟수
- interval : 재시도 간격(초)
- delta, max-interval : exponential interval을 원할 때 설정
위 과정으로 PTU → TPM 라우팅하는 로직을 생성할 수 있었습니다.
5-3. PTU -> TPM 으로 사용하기
PTU 는 비싸기도하고 100% 완전 사용하기가 어렵습니다. 그래서 하나의 PTU를 여러 조직에서 사용할 수 있도록 조작할 수 있는 방법이 필요했습니다. 쉽게 APIM 에서 API 를 나누고 각 API 단위로 Policy 를 적용시키면 안되는걸까? 그럼 조직단위 제어가 가능할 것 같다고 생각했습니다. 그러나 PTU 토큰 사용량의 계산 방식과 Policy 에서 적용하는 토큰 사용량 계산 방식이 달랐습니다. 예를 들어 아래와 같이 토큰을 사용했다고 가정합니다.
"usage": {
    "prompt_tokens": 10, // 입력 토큰
    "total_tokens": 30,
    "completion_tokens": 20 // 출력 토큰
}12345
-
PTU 토큰 사용량(GPT-4o 기준): 10 + (20 * 3) = 70 Tokens
-
Policy 적용 토큰 사용량(GPT-4o 기준): 10 + 30 = 40 Tokens
일반적으로 입력 토큰보다 출력 토큰이 더 비쌉니다. 위 계산식으로 계산을 한다면 PTU 를 활용하지 못하게 된다는 문제가 있었습니다. 이를 해소하기 위해 KT에서는 MS APIM PG(Product Group)팀과 협업하였습니다.
Output Token Weight 이라는 기능을 개발하였습니다. 아래 설정과 같이 TPM과 response에 대해 weight 을 반영하여 Token Rate Limit 을 적용하는 기능입니다.
<azure/llm-token-limit counter-key="key value"
        tokens-per-minute="number"
        response-token-weight="number"
        ...
        tokens-consumed-variable-name="policy expression variable name" />12345
이 기능은 2025년 7월에 APIM 에 새로운 기능으로 추가 될 예정입니다.
6. To Do
아직 많은 기능들이 추가되어야합니다. 그래서 현재 개발 및 조사중인 기능에 대해 간략하게 설명드리겠습니다.
6-1. RAI(Responsible AI)
LLM 을 개발하는 것도 중요하지만 “책임있는 AI” 라는 단어가 관심을 받고 있습니다. 이러한 트렌드에 맞게 Azure Content Safety, PII Tool 등 다양한 방법으로 IN/OUT에 대한 필터링이 필요하게 되었습니다.
그러나 이러한 필터들을 적용하기 위해서는 조금 우회적인 필터링 방법이 필요합니다. Input 에 대한 필터링은 쉬웠습니다. LLM 입력이 들어오는 경우 별도 API 로 입력 문자를 보내서 필터링하는 방법을 사용했습니다.
그러나 응답은 2가지 응답이 있었습니다. Batch, Stream 응답 2가지 모두 필터링을 진행해야합니다. Batch 인 경우 입력 필터와 같이 사용하면 가능했습니다. 그러나 Stream 응답은 꽤 복잡하고 어려웠습니다. 이러한 문제를 현재에도 해결 중에 있으며 어떠한 방법으로 해결하고 있는지 설명해보겠습니다.
|
방안 |
설명 |
문제점 |
|---|---|---|
|
Static Buffer |
일정 단위의 버퍼 길이가 되면 요청을 보내고 Buffer 를 비우는 방식 |
|
|
Dynamic Buffer |
초기 버퍼 길이는 작게, 점점 버퍼 크기를 증가시키는 방식 |
|
|
Stack Buffer |
초기 출력부터 Buffer 를 비우지 않고 쌓아서 보내는 방식 |
|
맺음
현재에도 많은 문제와 요구 사항들이 들어오고 있습니다. 이러한 요구 사항들을 받아들이기 위해서는 APIM 도 중요하지만 다른 플랫폼(Kong, LiteLLM 등)의 도움을 받아야 하는 경우도 생깁니다. 그래서 향후 AI Gateway 가 어떤 방향으로 흘러갈지 모르겠지만 5~6개월 간의 경험과 노하우로 어려운 문제들을 쉽고 빠르게 해결해 나갈 것이라 생각합니다.
KT의 요청에 따라 MS PG 팀의 기능이 배포되었으며, Output Streaming과 출력 토큰 비율 조정이 포함되었습니다. 이에 따라 MS와의 협업은 앞으로 더욱 중요해질 것으로 보입니다.
마지막으로 많은 도움주시고 고생하시는 AI Model Engineer 팀원분들에게 감사의 말씀을 전합니다.